The beauty of a top bar hive is that they can be made easily and
economically.
Although the Langstroth system is the hive of choice for most
beekeepers, it is not perfect. The top bar hive (tbh) fills the void for those
potential beekeepers who are looking for a needed alternative. These are not only people in a developing
country like Honduras, where I live, but also for some people in developed
countries like the United States.

My
wife Sofia and one of our simple top bar hives on a Honduran coffee farm.
Their main advantage for me is that they are very economic. I can start
bees in four or five tbhs for what I would spend on one three-box Langstroth
hive. The former is expensive, and even more so when you include all the extras
needed to use them as they were intended—an extractor, frames, wax foundation
and queen excluders.
And the other advantage is that people don’t need to be an expert
carpenter to build one. Even though I consider myself fairly handy in wood
working, if my measurements are off a bit or my cuts are a bit crooked, the box
will still work.
You should also be able to make the box with only a handsaw if it comes
to that point. That’s actually how I had to start out. I put a lot of sweat
into those first boxes but sometimes you need to do what you need to do.
A table saw is nice but not everyone has access to one. Only the bars, which
need more exact measurements and straighter cuts, require the use of this power
tool. But these are usually easy and cheap enough to contract out to a
carpenter.
A top bar hive has two main
parts—the box and the bars. The guidelines in this post are for making a basic
trapezoidal top bar hive—nothing fancy and with no extra options added, like an
observation window or ventilated bottom. For the most part, it’s how I build my
tbhs. I keep it simple.
Know, however, that there are other options and details that can be
added when making these hives.
There is not one standard size
for a top bar hive. This is both good and bad.
A negative is that if you inherit a tbh with bees or buy a tbh nucleus
hive, it may not fit in your box. Your box may be narrower or shallower for the
combs that you are receiving. You may have to trim the them so they fit. The
problem may also occur if you make nucs for sale and they don’t fit into you
client’s box.
The positive side is that you make your box according to your local climate
conditions or the materials you have available. There is no one correct size
for them.
The length of available boards may dictate whether you make a four or
five-foot long box. The width of the available boards may dictate whether the
box will be 10 inches or 12 inches deep.
The climate and temperature can also influence the measurements. In a
very hot climate, you may want a shallower box to avoid comb collapse during
high temperatures. A smaller comb means less weight. You can probably use a
deeper box without a problem where the temperatures are cooler in a northern
climate or in the mountains of a tropical area. Also, consider temperature
issues if the hive will be in full sun or a shaded area.
So, you need to decide on a size and use it as your standard for all the
tbhs you will eventually have. You want to keep at least everything within your
own apiary the same size. You want everything to be interchangeable.

A
slightly shallower top bar hive for Jamaica’s warm climate.
Since I began beekeeping as a
Peace Corp volunteer, my original plans came from one of their manuals, “Small
Scale Beekeeping.” At that time, 1991, I didn’t have access to internet
(Was there even internet at that time anyways?) and my learning resources were
limited. I used the plans the book gave me. Luckily they worked well with
Honduras’ Africanized bees. I’ve used the same sized box for 25 years now.
These plans called for a trapezoidal box with internal measurements of 12 inches deep, 17.5
inches across the inside of the top and 7.5 inches across the inside of the bottom.
But as I mentioned, one of the factors that determines the size of your
boxes is the materials available. If I need boards in Honduras, I have someone
cut down a pine tree and saw it up. My original plans called for a box that was
12 inches deep so I had them cut 12 inch boards.
I’ve given some tbh trainings in Jamaica. The easiest way to get wood in
Jamaica is to buy pine boards at the hardware store. This wood is imported but
it is sometimes the cheapest and easiest option. But these boards were only
about 11 ¼ inches wide. Because of this, they made the boxes shallower—based on
a design by Les Crowder.
Boards are not the only option for making a tbh box. You can use
recycled wood from pallets or alternative materials such as bamboo or metal
cans. See this post on the blog: Musings About Economical
Beekeeping: Inexpensive Alternative Hive Materials.
The bottom can be one continuous board. You could also use your scrap
pieces of wood and join them together to form the bottom.

A
top bar hive I made with my brother in Wisconsin from old barn boards and
pallets. It used the same internal measurements as my Honduran tbhs—12 inches
deep, 17.5 inches across the inside of the top and 7.5 inches across the inside
of the bottom. The bars are 19 ¼ inch long so they can fit in a Langstroth box
if necessary.
I usually advise people to make
the box at least four feet long. It can be longer. In fact, that’s
probably better.
You don’t want to run out of space. The bees swarm when they sense there
is no longer room for the queen to continue laying eggs or for the workers to
store nectar. Most of my boxes are about five feet long to help prevent this.
If you do intensive management, you will stay on top of space issues in
a shorter box. If you do minimal management (like I do with some of my hives)
you will want the longer boxes with more space as extra insurance against them
running out of room.
Having a longer box also gives you an initial working space at the end.
If the last couple bars are empty, it is much easier to remove that first comb.
It can be difficult to remove that one when the bees fill the box completely from
one end to other.
But again, the length will depend on the material you have available. If
I find boards that are nine feet long (there is no standard size for boards in
Honduras), I will make my boxes only 4 ½ feet long. I deal with what I get.
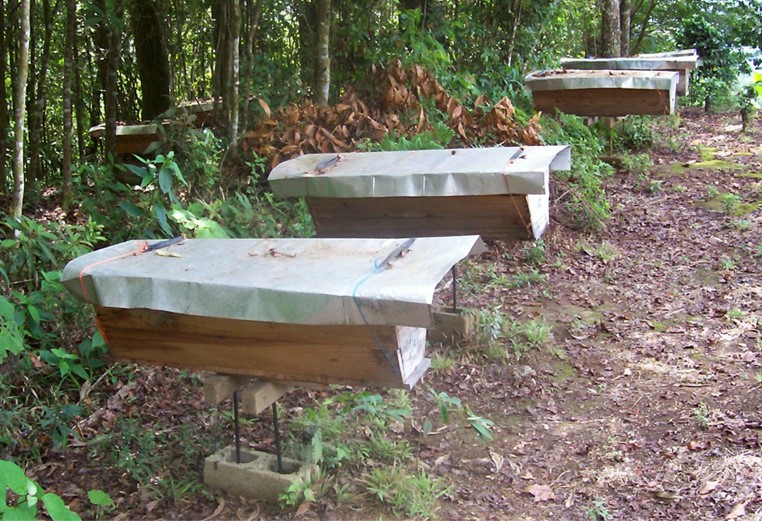
Four-foot
hives in my coffee farm apiary. The two hives in the back are five feet long,
my preference. The length was dictated by the available wood, in this case
recycle boards from the construction of a building.
Entrance locations can vary according
to the want of the beekeeper. I place all my entrances at one end with a small two-inch
landing board. In part this is so I can set a pollen trap on it for use with my
hives. Sometimes I will add an extra smaller entrance at the back.
Other beekeepers prefer a side entrance—just several one-inch holes in
the middle or sometimes toward the end. Still other beekeepers simply leave a
bar out to form a top entrance.
There really is no correct answer for this. It is more the preference of
the beekeeper. If you think about wild colonies, they never have their
entrances in a specific space. All the entrances are according to the cavity
that nature created or the structure man made. Sometimes they need to enter
from below, sometimes from the side and sometimes from the top. Sometimes there
are multiple entrances. The bees adapt to what they must use.

One
of my top bar hives with a two-inch landing board at the main front entrance
but also a smaller back entrance. This secondary entrance sometimes becomes the
bees’ main choice to come and go from the hive. Notice the darker yellow pollen
smudge around the entrance from the heavy traffic it had.
The only thing that really needs
exact measurements is the top bars. The norm for
the top bar’s width is 1 3/8 inches or 3.5 cm. The groove
underneath for attaching the starter strip should be exactly in the middle. It
only needs to be one-quarter inch deep. The idea is that each bar has one comb
built from the center.
I recommend using a length of 19 ¼ inches so the bar will fit into a
Langstroth hive if you want to temporarily transfer a comb into one. For
example, the Langstroth hive went queenless but you can give it some good brood
from strong productive colony you have in a top bar hive.
Or the opposite could be true if you use a Langstroth colony to begin
comb on top bars for starting a tbh hive.
The thickness I use for my bars is normally 5/8 of an inch. It can be
more. If you go thinner, especially less than ½ inch, the bar might bow downward
because of the weight of a comb.
There was a top bar project I read about that used paint stirring sticks.
They were the correct width and easy to obtain but rather thin. After a time,
all the sticks were bowed downward from the weight of the comb on them.

The bars should also have a
starter strip. The idea is that something hangs or protrudes down a
bit so the bees use it as a guide to build the comb along the very center of
the bar. It only needs to hang down about one-quarter of an inch. Having a
wider starter strip can actually complicate things—the bees do not attach their
comb securely to the bar itself, only to the guide. The result is eventual comb
collapse.
The starter strips are normally something simple. I often use half-inch
strips of paper that I dip into melted wax two or three times to get a good
thickness. They are then glued into the bar’s groove with some more wax. I’ve
also used wax covered popsicle sticks.
Other possibilities are just a simple wood wedge, a piece of wax covered
string or a strip of foundation. Some beekeepers promote not even using starter
strips (which implies feeding empty bars between well-center combs, which you
need first—usually with bars that have starter strips).

The
bees use a starter strip to ensure the comb is built in the very center of the
bar. This starter stirp is waxed-covered popsicle sticks.
Other than this, add some sort of
cover for the rain and a stand to set it on and you’re ready for the
bees.
See these following resources for other options for top bar hive
construction.
Peace
Corps’ “Small Scale Beekeeping”—the original 1983 version by Curtis Gentry.
This is what I had and used as a volunteer. The tbh plans are on page 110. All my
top bar hives are based on these measurements.
Peace
Corps’ “Small Scale Beekeeping”—an updated 2014 version of the book. It has
plans for a tbh on page 133 but they are for a slightly different model and
with slightly different measurements from the original book.
“Build
Your Own Top Bar Hive” by Yerba Buena Farm in St. Mary, Jamaica. Their
manual is for making tbhs using the imported pine boards commonly found in
hardware stores on the island. This is basically the same size for Les
Crowder’s hive. They also offer a one-page
handout for this tbh, with all the basic information.
“How
to Build a Top Bar Hive” by Phil Chandler of Barefoot Beekeeping and the
biobees.com Natural Beekeeping
Forum. This is his free manual for making his version of a top bar hive.
You can get his 2015 version for free from his Lulu book sales page with the
first link or a slightly earlier version directly from this
second link.
“How
to Make a Movable Comb Top Bar Hive” by Pam Gregory, who has done
beekeeping trainings in Africa. This is through FAO’s TECA website.
Musings About Economical
Beekeeping: Inexpensive Alternative Hive Materials
and Musings About Economical
Beekeeping: “Hives for Nothing, Bees for Free”, two posts
from my blog about making top bar hives.
A search on the internet will give you other plans and other top bar
hive designs (enough to overwhelm you maybe!).
---Tom

Piecing
together the floor during one of my top bar hive construction workshops in
Jamaica.

Simple
wax covered strips of paper for starter strips or comb guides.
----------
If you enjoyed this blog post or found it useful, please share it on
social media.
Also, see my Facebook page (“like” it!) and my companion blog in Spanish,
Reflexciones Sobre Apicultura .
Comments and questions are always welcomed.
Great post. I tried to make the wax-covered strips and this wasn't as easy as I thought it to be. The first time we tried to melt wax by using a flat plan on low cooking gaz-fire. Within minutes we were surrounded by bees, so we stopped that trial. The next day I put the wax on an aluminum pan and covered it with a glass sheet. In the sun and it melted nicely and bees were not interested. To get a smooth and even cover of the paper strips was not so easy, maybe because it was because of the flat pan we used. But to paste them into the grooves with a spoonful of liquid wax was easy, but one has to be quick as the wax hardens quickly. We made about 55 wax-strips. Thanks for the information.
ReplyDeleteSaludos Job. I´m glad the information in this post was useful for you.
ReplyDeleteI usually use a deeper container/bowl/pot when making the starter strip. I melt the wax in a double boiler. The paper sort of folds over as it goes down into the wax. If you notice in the picture, the ends seem to be covered with a bit less wax—that’s because this is where I hold onto them when dipping. I don’t want to burn my fingers. You can always dip just that tip to cover them better.
Hi Tom,
ReplyDeleteMy name is Anuj Agarwal. I'm Founder of Feedspot.
I would like to personally congratulate you as your blog Musings on Beekeeping has been selected by our panelist as one of the Top 60 Beekeeping Blogs on the web.
http://blog.feedspot.com/beekeeping_blogs/
I personally give you a high-five and want to thank you for your contribution to this world. This is the most comprehensive list of Top 60 Beekeeping Blogs on the internet and I’m honored to have you as part of this!
Also, you have the honor of displaying the badge on your blog.
Best,
Anuj
Thanks, Anuj, for making me part of your list of top beekeeping blogs. I am also honored that you have included me as part of this list of prestigious blogs.
ReplyDelete---Tom
I got here much interesting stuff. The post is great! Thanks for sharing it! Beekeeper Honey Stick
ReplyDelete